
Pre-Payment Page
The page the shopper sees after the cart, where they choose the address, shipping method and gateway. Farin builds only its appearance; underneath is the same WooCommerce checkout, so all gateways (such as Zarinpal) and shipping plugins work as before.
Where is it? Farin → Site content → Checkout and Payment → Pre-Payment Page
This page has two sections. At the top is Page appearance preview, ready-made design, layout, column widths and texts. At the bottom is Form content : which fields appear, guest checkout, official invoice, custom fields and colors.
Preview and layout editing
At the top of the page is a live preview of the payment page. With the “Shipping info” and “Payment” buttons you see its two steps, and with “Desktop” and “Mobile” you change the page size. The preview is filled with a sample order; on the site, the shopper’s own cart and your store’s gateways and shipping methods appear in it.
The “Edit layout” button opens a window that shows the page sections in three rows: “Top of page”, “Form columns” (right, middle and left columns) and “Bottom of page”. You can move each section to another column or row and open its own settings right there:
| Section | What it does |
|---|---|
| Checkout steps | The “Cart › Shipping info › Payment › Order complete” bar. It is turned on and off with the “Checkout steps bar” option. The step names are on the Cart . |
| “Safe and secure shopping” column | A column with a title, text and up to six trust rows; each row has an icon (shield, return, headset, card, truck, gift, clock, star, verified badge, lock), a title and a short text. It is hidden on pages narrower than 1150 pixels. |
| Shipping and payment form | The address book, recipient form, shipping method and gateways. It always stays in the “Form columns” row. |
| Order summary | Products, discount code and total. This one also always stays in the columns row. |
| “Safe purchase” box | A small green box with a shield. If the “Box title” is left empty, the box does not appear. |
| Custom section 1 and 2 | A place for your own text, HTML or shortcode, for example a notice about shipping times. It is saved with “Apply”. |
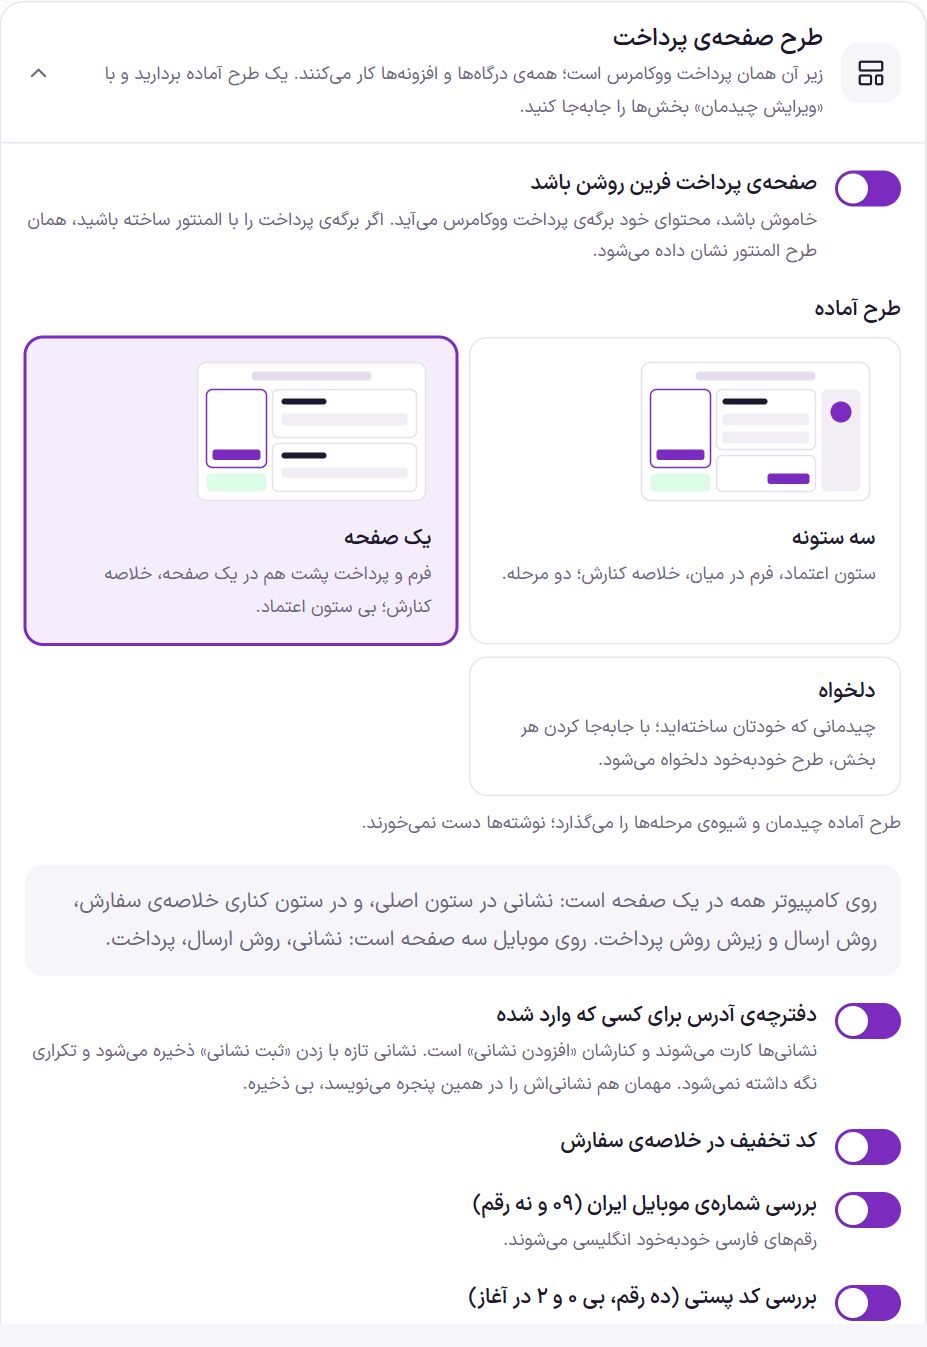
Payment page layout
| Option | What it does | Default |
|---|---|---|
| Farin payment page enabled | When off, the content of the WooCommerce payment page itself is shown. If you built the payment page with Elementor, that Elementor design appears. | On |
| Ready-made layout | “Three columns”: a trust column, the form in the middle and the summary beside it, in two steps. “One page”: the form and payment one after another on a single page with the summary beside it, without a trust column. “Custom”: a layout you built yourself; move any section and the layout automatically becomes “Custom”. A ready-made layout changes only the layout and how steps work, and does not touch the texts. | Three columns |
| Address book for logged-in users | The shopper’s addresses are shown as cards with “Add address” beside them. More details in Address book. | On |
| Discount code in order summary | A box for entering a discount code in the order summary column. | On |
| Check Iranian mobile numbers (09 and nine digits) | Any number other than 09 and nine digits is not accepted. If the shopper types Persian digits, they are automatically converted to English. | On |
| Check postal code (ten digits, not starting with 0 or 2) | The postal code must be ten digits and must not start with 0 or 2. Persian digits are converted to English here too. | On |
On desktop everything is on one page: the address in the main column, and in the side column the order summary, the shipping method and, below it, the payment method. On mobile it is three pages in a row: address, shipping method, payment.
Address book
A logged-in shopper sees their previous addresses as cards and picks one with a tap. “Add address” opens a window with the same fields as the recipient form; clicking “Save address” saves the new address on the spot and makes it the default. An address entered with an order is also kept. A duplicate address (same number, address and city) is not saved again, and each shopper has at most 20 addresses.
A guest also writes their address in this same window, but nothing is saved for them.
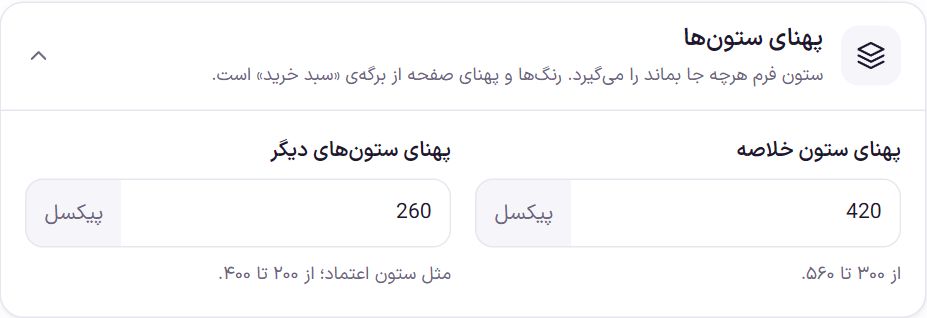
Column widths
| Option | What it does | Default |
|---|---|---|
| Summary column width | The width of the order summary column, from 300 to 560 pixels. | 420 px |
| Width of other columns | The width of side columns such as the trust column, from 200 to 400 pixels. | 260 px |
The overall page width and the colors come from the Cart tab.
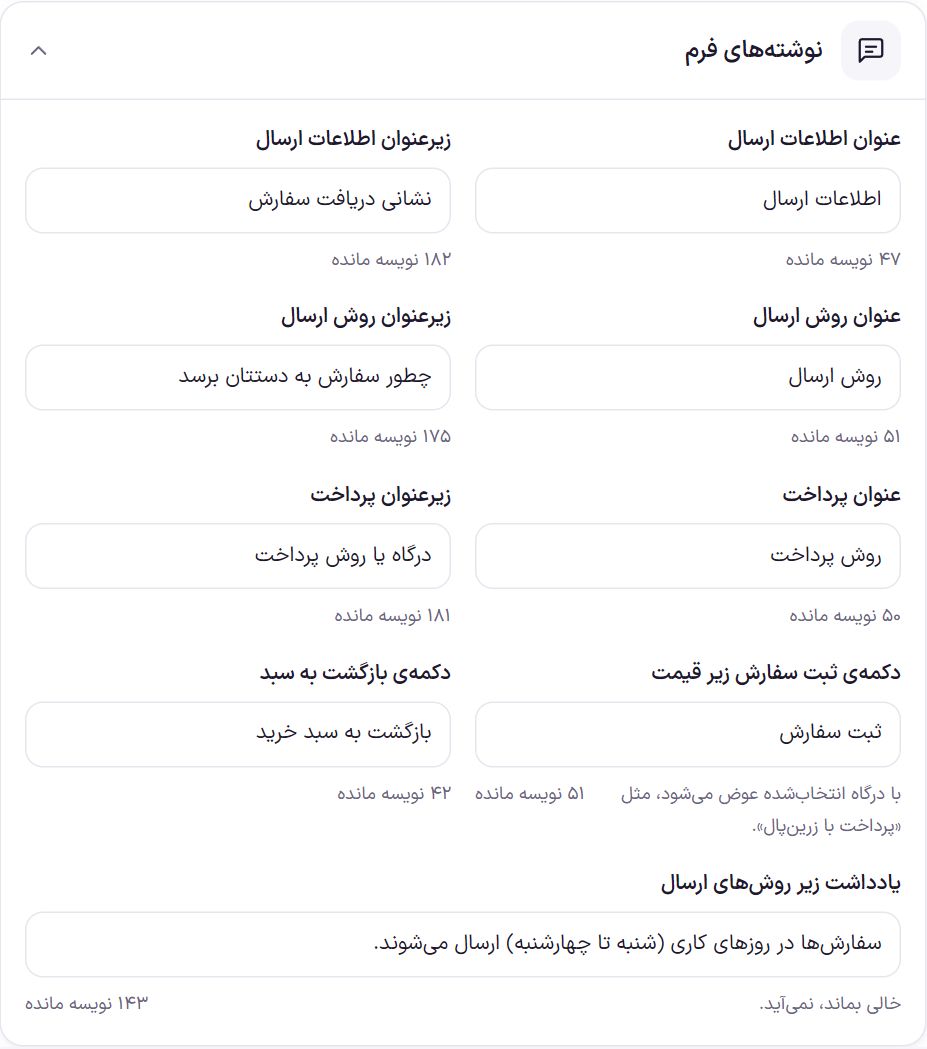
Form texts
| Option | What it does | Default |
|---|---|---|
| Shipping info title | The address section title. | Shipping info |
| Shipping info subtitle | A short sentence under that title. | Delivery address |
| Shipping method title | The title of the shipping method selection section. | Shipping method |
| Shipping method subtitle | The sentence under the shipping method title. | How should your order reach you |
| Payment title | The gateways section title. | Payment method |
| Payment subtitle | The sentence under the payment title. | Gateway or payment method |
| Place order button under the price | The text of the final button. When the shopper chooses a gateway, it changes to that gateway’s name, such as “Pay with Zarinpal”. | Place order |
| Back to cart button | A link that takes the shopper back to the cart. | Back to cart |
| Note under shipping methods | A sentence under the list of shipping methods. If left empty, it does not appear. | Orders are shipped on business days (Saturday to Wednesday). |
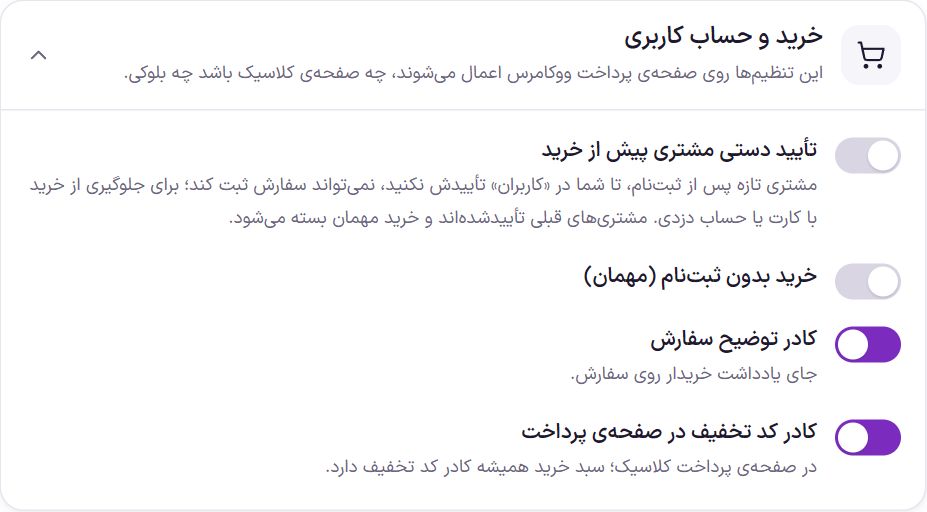
Purchase and user account
These settings apply to the WooCommerce payment, whether it is the classic payment page or the block one.
| Option | What it does | Default |
|---|---|---|
| Manual customer approval before purchase | A new customer cannot place an order after signing up until you approve them, and sees the message “Your account has not been approved yet”. It is meant to prevent purchases with stolen cards or accounts. Customers who signed up before you turned this option on are counted as approved. An account that the site admin (someone with permission to create users) creates in the dashboard also needs no approval. While this option is on, guest checkout is closed. | Off |
| Purchase without signing up (guest) | The shopper orders without creating an account. It appears only when manual approval is off. | On |
| Order notes box | A box where the shopper leaves a note on the order. | On |
| Discount code box on the payment page | The discount code box at the top of the WooCommerce classic payment page. The cart always has a discount code box. | On |
Customer approval in “Users”
- Open “Users” in the WordPress dashboard. When manual approval is on, a column called “Purchase approval” appears in the list, showing “Pending” or “Approved” for each user.
- Hover over the customer’s name. The “Approve to purchase” link appears under the name.
- Click “Approve to purchase”. From that moment the customer can place orders.
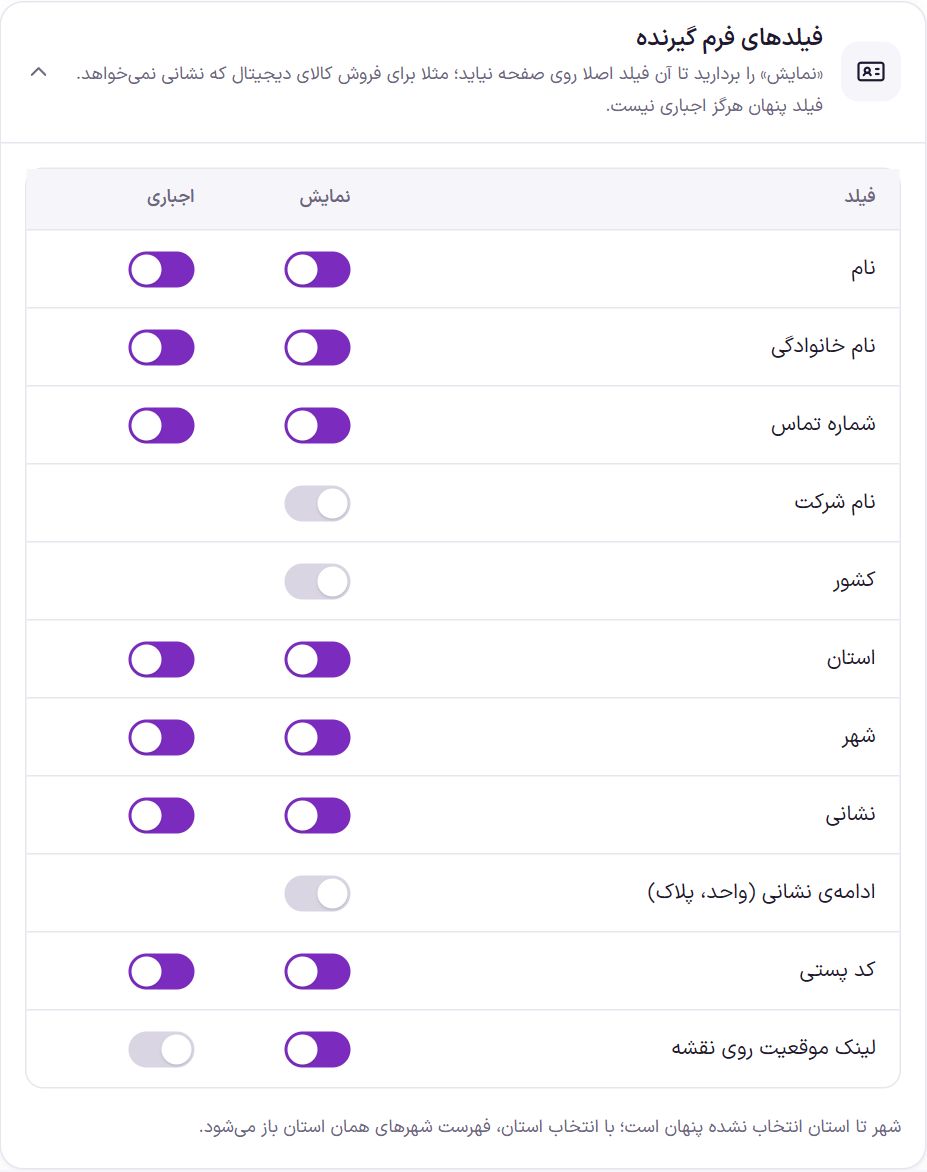
Recipient form fields
Turn off the “Show” switch so that field does not appear on the page at all; for example, when selling digital products that need no address. A hidden field is never required. This table affects the Farin payment page as well as WooCommerce’s classic and block pages.
| Field | Description | Default |
|---|---|---|
| Name | The recipient’s first name. | Show, Required |
| Last name | The recipient’s last name. | Show, Required |
| Phone number | The recipient’s mobile number. If “Check Iranian mobile numbers” is on, it must be 09 and nine digits. | Show, Required |
| Company name | For business purchases. | Hidden |
| Country | Off means all orders go to the store’s country. Turn it on and the “Countries the shopper can choose” box opens. | Hidden |
| Province | The list of Iran’s provinces. | Show, Required |
| City | Hidden until a province is selected. Once a province is chosen, the list of that province’s cities opens. | Show, Required |
| Address | Street, alley and number. | Show, Required |
| Address line 2 (unit, number) | The second line of the address. | Hidden |
| Postal code | If “Check postal code” is on, ten digits not starting with 0 or 2. | Show, Required |
| Map location link | A place for the shopper’s location sharing link; full details in the next section. | Show, Optional |
If “Country” is on, separate the country names with commas in the “Countries the shopper can choose” box; for example Iran, Turkey, Iraq
. The default is “Iran” only.
Map location link
This field helps the courier find the shopper’s home more easily. The shopper taps their spot in Neshan, Balad or Google Maps, chooses “Share” and pastes the link into this box. There is no map inside the page, and it needs no key or paid service.
- Which links are accepted. Links from Neshan, Balad, Google Maps, OpenStreetMap and Waze. If the shopper pastes text containing a link (such as a message a map app generates), only the link itself is taken. Latitude and longitude, such as
35.7816, 51.3738are also accepted and converted to a Google Maps link. - If the link is not recognized. The shopper sees the message “Location link not recognized” and must paste a correct link or leave the box empty.
- Where it appears. The “Open location on map” link on the order page in the dashboard (under the billing address), in emails sent to the store (such as the new order email) and on the shopper’s own order page. It is also kept beside each address in the address book.
If you don’t want this box in the form, turn off its “Show” switch. If it is essential for courier delivery, turn on “Required”.
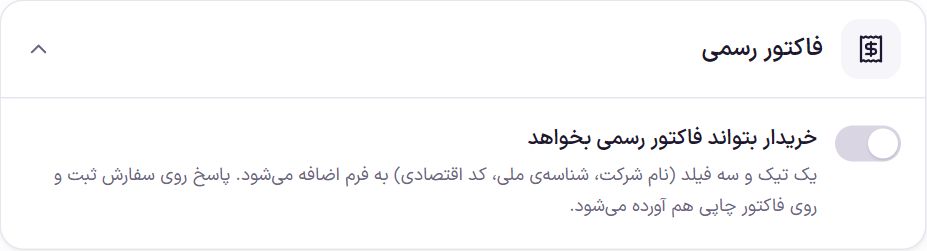
Official invoice
| Option | What it does | Default |
|---|---|---|
| The shopper can request an official invoice | A “I want an official invoice” checkbox and three fields for the company or legal entity name, national ID and economic code are added to the form. The answers are recorded on the order and also included on the printed invoice as well. These three fields are optional. | Off |
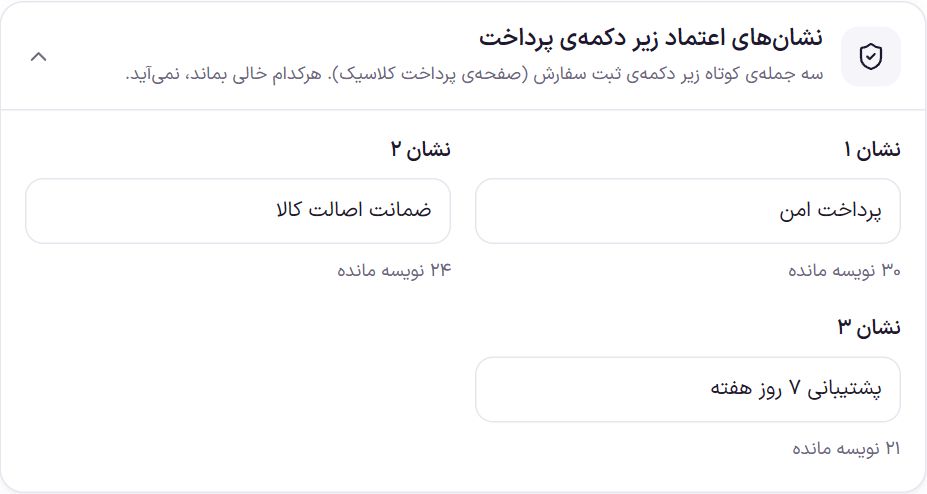
Trust badges under the payment button
Three short sentences, each up to 40 characters, under the Place order button on the classic payment page. Any left empty does not appear.
| Option | What it does | Default |
|---|---|---|
| Badge 1 | The first sentence. | Secure payment |
| Badge 2 | The second sentence. | Guaranteed authentic products |
| Badge 3 | The third sentence. | Support 7 days a week |
Custom fields
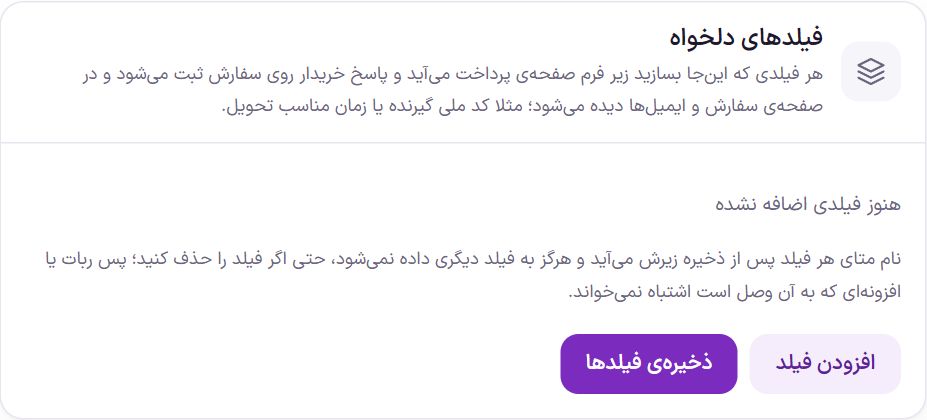
Every field you create here appears under the payment page form. The shopper’s answer is recorded on the order and is visible on the order page and in emails; for example, the recipient’s national ID or a convenient delivery time.
- Click “Add field”. A new row opens.
- Write the “Label”. What the shopper sees above the box, up to 80 characters.
- Choose the “Type”. “Short text” for writing, “Select” for a dropdown list and “Checkbox” for a yes/no option.
- Fill in the type details. For short text, give the “Placeholder text inside the box”. For select, write the “Options (one per line)”; up to 30 options.
- If an answer is needed, tick “Required”.
- Click “Save fields”. This list has its own save.
After saving, each field’s meta name is written under it. This name is never given to another field, even if you delete the field; so a bot or plugin connected to it will not read another field’s answer in its place, and answers on old orders do not get mixed up.
Colors
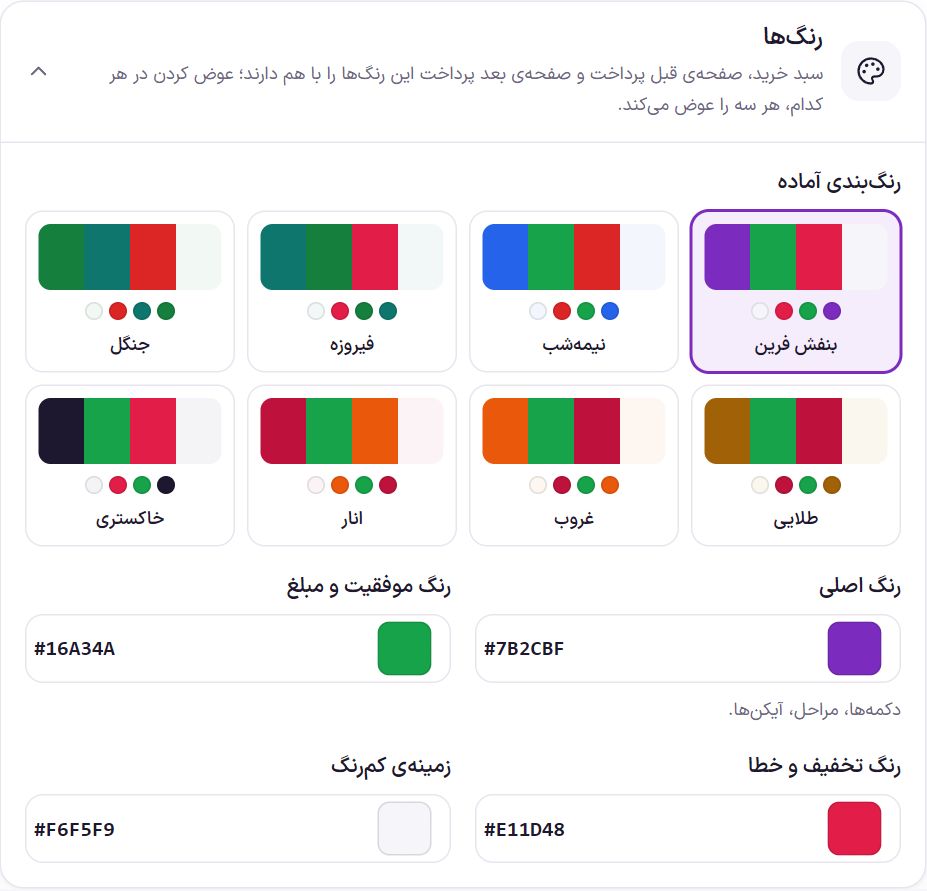
The cart, the pre-payment page and the post-payment page share these colors; if you change them in any one, all three change. Click one of the eight “Ready-made color schemes” or set the colors one by one.
| Option | What it does | Default |
|---|---|---|
| Main color | Buttons, steps and icons. | #7B2CBF |
| Success and amount color | Success messages and amounts. | #16A34A |
| Discount and error color | Discounts and error messages. | #E11D48 |
| Light background | The background of boxes and sections. | #F6F5F9 |
Frequently Asked Questions
Will my gateway work with the Farin payment page?
Yes. The Farin page is the same WooCommerce classic payment with a new look; any gateway or plugin that works with WooCommerce works here too. If a plugin shows nothing, turn off “Farin payment page enabled” and try again to find where the problem is.
I only sell digital products. How do I remove the address?
In “Recipient form fields”, turn off the “Show” switch for province, city, address, postal code and location link. A hidden field is never required, so the shopper completes the purchase with a name and phone number.
I built the payment page with Elementor. Which one is shown?
If the Farin payment page is on, the Farin page. If you turn it off, your Elementor design is shown.
I turned on manual approval. Do existing customers need approval too?
No. Only those who sign up after you turn it on stay pending approval. But guest checkout is closed for everyone.
Farin Theme · 1405