Authentication
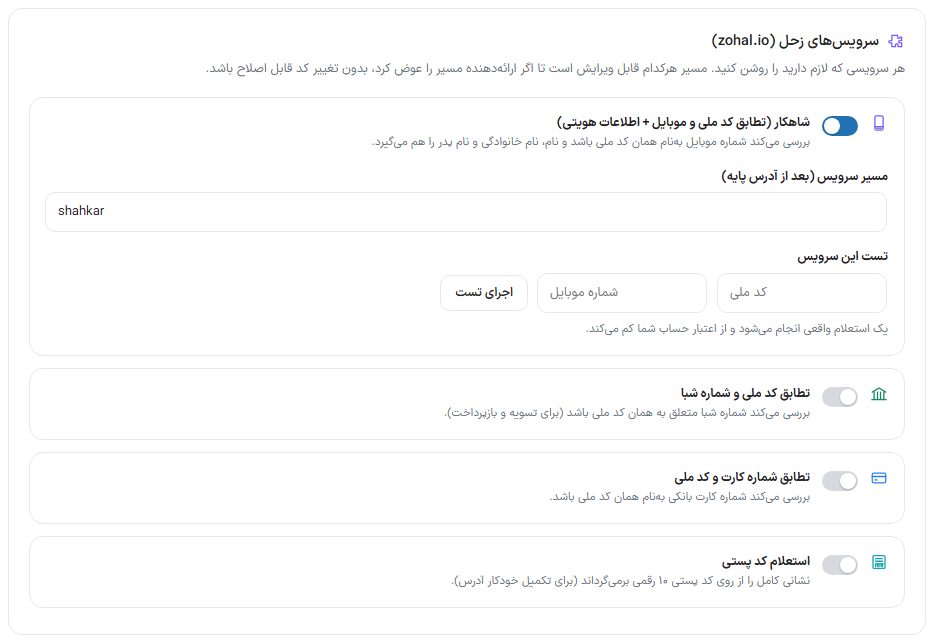
With an inquiry service, you verify the customer’s identity at sign-up: that the mobile number is registered to that national ID (Shahkar), and if needed bank card and IBAN matching and address lookup from the postal code.
Where is it? Rafina Panel → Authentication
Setup
- On the provider’s site (Zohal), create an account, buy credit, and get an API token. The “Zohal documentation” link in the connection box is there.
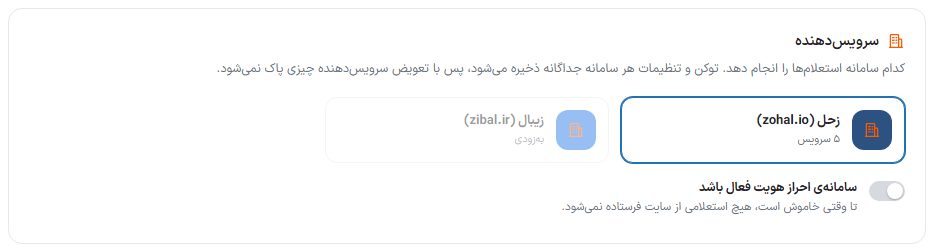
- In the “Provider” box choose Zohal and turn on “Identity verification system enabled”.
- Write the token in “API token”.
- In the services box, turn on “Shahkar” and any other service you need, and check once with “Run test”.
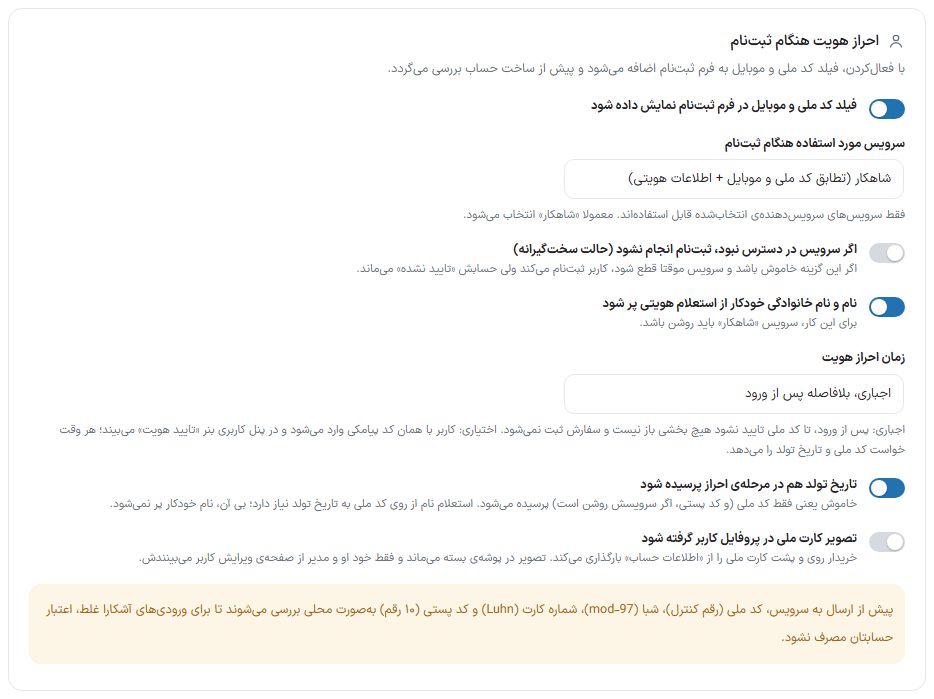
- In the “Verification at sign-up” box, turn on field display and click “Save verification settings”.
Provider
| Option | What it does | Default |
|---|---|---|
| Provider | Which system performs the inquiries: “Zohal (zohal.io)” with five services, or “Zibal”, which is coming soon. Each system’s token and settings are saved separately, so switching the provider deletes nothing. | Zohal |
| Identity verification system enabled | While off, no inquiry is sent from the site. | Off |
Connection to the provider
| Option | What it does |
|---|---|
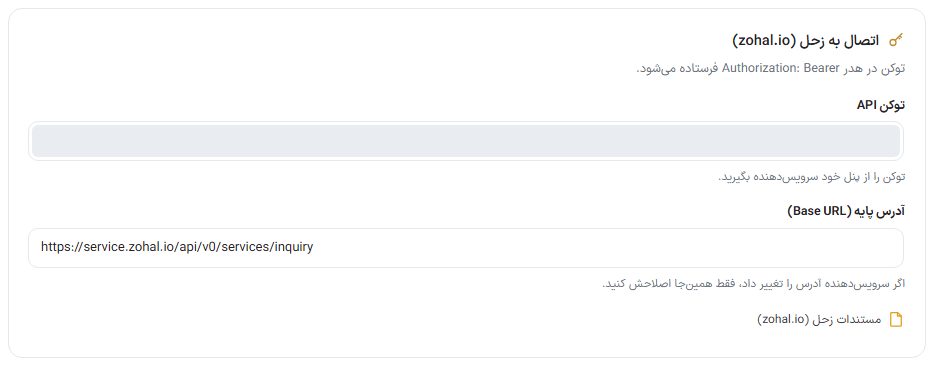
| API token | The token you got from the provider’s panel. It is hidden after saving; to change it write a new value, and an empty field means the previous one. |
| Base address (Base URL) | The service address. Fix it only if the provider changed the address. Only the site’s main administrator can change it; changing the address without a new token deletes the saved token so it isn’t sent to a different address. |
| Zohal documentation | A link to the service’s own guide. |
Services
| Service | What it does |
|---|---|
| Shahkar (national ID and mobile match + identity info) | Checks that the mobile number is registered to that national ID and also gets the first name, last name, and father’s name. |
| National ID and IBAN match | Whether the IBAN belongs to that national ID (for settlement and refunds). |
| Card number and national ID match | Whether the bank card is in the name of that national ID. |
| Postal code lookup | Returns the full address from a 10-digit postal code, to fill in the address automatically. |
| Service path (after the base address) | Appears when the service is on. If the provider changes the path, it is fixed here without code changes. |
| Test this service / Run test | Runs a real inquiry with sample input (for example a national ID and mobile number) and shows the result (“Matches” or “Does not match”). It deducts from your account credit. |
Verification at sign-up
| Option | What it does |
|---|---|
| Show national ID and mobile fields in the sign-up form | A national ID field is added to sign-up and checked before the account is created. The result is recorded on the customer’s account. |
| Service used at sign-up | Which service is used at sign-up. Only services of that provider can be chosen; usually “Shahkar”. This drawer’s list also has the “Identity info inquiry” option, which has no separate row in the services box. |
| If the service is unavailable, block sign-up (strict mode) | When off and the service is temporarily down, the customer signs up but their account stays “Not verified”. When on, sign-up is impossible until the service returns. |
| Fill first and last name automatically from the identity inquiry | The account name is filled from the inquiry result. The “Shahkar” service must be on. |
| Verification timing | “Required, right after login” or “Optional, from the user panel (like Digikala)”. Both are described below. |
| Also ask for date of birth in the verification step | Off means only the national ID (and postal code, if its service is on) is asked. The name inquiry from the national ID needs the date of birth; without it, the name isn’t filled automatically. |
| Collect a national ID card image in the user profile | The buyer uploads the front and back of the national ID card from “Account info” (desktop, web app, and custom app). The image stays in a closed folder and only that user and the admin see it from the user edit page; the direct address is closed to everyone else. Off by default. |
| Read and check the national ID from the card image (Zohal) | The card image goes to Zohal’s “national card reading” service and the national ID on the card is compared with the account’s national ID. Each upload is one inquiry and uses Zohal credit. Shahkar itself doesn’t accept images; this check sits beside it, not in its place. This switch is visible only when “Collect a national ID card image in the user profile” is on and the provider is Zohal. Off by default. |
Required or optional verification
| Mode | What it means for the customer |
|---|---|
| Required, right after login | After login, no section is open and no order can be placed until the national ID is verified. If the national ID doesn’t match the mobile number, the user is signed out. This is the default. |
| Optional, from the user panel (like Digikala) | The customer signs in with the same SMS code and is blocked nowhere; they can browse, buy, and order. In the user panel they see an “Identity verification” banner and, whenever they like, enter their national ID and date of birth in a window. If it doesn’t match, they only get a message and are not signed out. |
The “Identity verification” banner and window appear in the user panel on desktop, web app, and custom app. If “Also ask for date of birth in the verification step” is off, the window asks only for the national ID.
Recent inquiries
At the bottom of the page is the list of recent inquiries with time, provider, service type, and result. A red row means the inquiry returned no result. With “Live update” the list refreshes automatically and the “Refresh” button refreshes it right now.
Frequently Asked Questions
The store manager doesn’t see the token.
The token and base address are visible and changeable only to the site’s main administrator. For others, an empty field means “the saved one”.
Inquiries are red.
Check the provider account credit, the token, and that the service is turned on in the provider’s own panel, and click one “Run test” to see the error message.